
Hitty Basic dress Pattern Instructions:
This is an incredibly simple pattern, but it is worth passing on because of its versatility. It can be used for a nightgown or a wide variety of dress styles. It is an excellent dress for machine sewing, although you must be careful to do all ironing as directed for good results by machine. I recommend printing these instructions before you begin and having them on-hand as you sew. A Hitty Friend recently has used this pattern, and let us know that the finished product does fit the Ingeborg Tinius Hittys, which are a little bigger than other Hittys. Just make sure you adjust the length to fit the Hitty you're sewing for!
Materials:
-¼ yard of fabric will make about 3-4 dresses.
-thread to match the dress color and trim colors
-Iron
- 1/8 yard Round beading elastic or very narrow flat elastic—a color that matches the dress if possible, although it’s not necessary to match.
-Darning needle large enough for elastic
-Ribbon, lace, buttons, and beads as desired for trimming
-Super glue
-Fray check
Instructions:
Print out the Pattern, and verify that it has printed at
the correct size.
Cut out all pieces. Vary
the length of the dress and sleeves based on the size of your doll, the style
desired and the number of tucks you will be putting in the skirt or on the
waistline. It is not necessary to
vary width of the pieces or overall size of the pattern unless this is for an
exceptionally large or small Hitty doll.
If you are sewing by hand, cut the dress piece in two along the fold.
If you are sewing by machine, leave it in one piece for now.
With your iron, press up 1/8 inch along the bottom of the
dress piece. (Do both pieces
separately if you’re sewing by hand, but we will refer to it as one piece in
these instructions.) Press the hem
up another 1/8 inch to create an enclosed hem.
Stitch and press.
Decorate the dress piece as desired along the skirt.
I usually use lace or tucks. (Be
sure if you’re creating tucks or enclosing the edge of the lace in the skirt
that this doesn’t make the dress too short.
If you wish to encase a drawstring or elastic at the waistline, create
the larger tuck for the casing at this time.
Press skirt piece when necessary so that it remains flat.
When the skirt is completed, Cut along the fold line if you have not
already done so.
Fold up 1/8 inch on sleeves and press. Fold up another 1/8
inch OR enough to create a channel for your elastic and press. Remember
to make sure that the channel is large enough for the darning needle to pass
through.
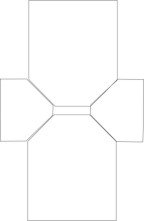
With right sides together, sew each sleeve to either side of one of the dress pieces along the diagonal edges with a ¼ inch seam, leaving about ¼ inch open at the top of the seam near the neckline. With right sides together, sew the remaining dress piece to the sleeves on either side along the diagonal pieces, leaving about ¼ inch open at the top of the seam. Press flat, as in the illustration below:
Laying the dress right side down, press all four shoulder
seams open, continuing the folds up to the neckline. Be very careful with your pressing if you have
hand-sewn—you may want to reinforce the seams before you press them open.
Then, press down 1/8 inch from the top edge in the neckline, making sure
that the folds created by opening the seams stay in place.
Press down another 1/8 to 1/4 inch, making sure that the channel created
will be wide enough for your darning needle and elastic, or a ribbon drawstring
if desired. Repeat for the neck
edges of both sleeves and both dress sections, and pin in place.
Stitch around neckline in a continuous seam, hemming the edges you’ve
created and passing over the shoulder seam from the edge of one hem to another,
making sure that you leave either side of each hem open.
(The edges of each hem should already be finished by the seam edges being
folded inside.)
If you wish to add tucks or trimming to the sleeves, do so
at this time. After you have done
this, thread the end of your elastic through the darning needle. DO NOT cut the
elastic from the skein—this will create waste. String the elastic through the channel in one sleeve,
and remove the needle. Pull the
elastic back through until it passes through the channel and the end is even
with the opposite edge of the sleeve. Secure the end of the elastic at the edge
by sewing back and forth across it several times, using the reverse button on
the sewing machine. When it is
secured, pull the elastic from the other side, gathering the sleeve.
(remember to leave the gathered edge long enough to make the underarm
seam.) When it is gathered, sew
over the elastic on the other side of the sleeve, securing the elastic on that
side. Snip the elastic off at the
edge. Repeat for other sleeve.
Fold the dress along the middle of the sleeves, with right
sides together, so that the edges of the dress pieces and the bottom edges of
the sleeves are lined up. Pin.
Starting from the bottom edge of the hem, stitch a ¼ inch seam up the
side seam and down the sleeve seam. Repeat
for both sides. Treat the seams with fray check to prevent fraying, paying
particular attention to the underarm corner and the bottom edge. You can trim
the seams to make them narrower after the treatment if you wish.
Treat the shoulder seams with fray check at the same time. Clip underarm curves. Turn
right-side out. Using the darning
needle, run elastic or ribbon through the four channels around the neckline.
Be careful not to ‘drag’ the raw edges that you folded in back out of
the channel. Once it is gathered, the open areas won’t show at all.
Gather as desired. If using a ribbon drawstring, secure the ends with knots or
beads so they won’t go back through the channels.
If using elastic, tie the
ends of the elastic together 3 or 4 times to create a tight knot, and secure the
knot with a drop of crazy glue. Rotate
the elastic so that the knot is hidden in one of the wider channels.
If you created a channel to gather the waistline, turn the dress inside
out. The channel will not have any
opening. Using the darning needle,
pass the ribbon or elastic into the channel at the desired point.
You made need to pass it outside again to go around the side seam and
back into the channel on the other side. This
is why we’re using a darning needle. If
you are using elastic, knot the ends and secure with a drop of super glue.
If you’re using a ribbon drawstring, pass the ends through to
the outside of the dress wherever you’d like the bow to tie, and secure
the ends with knots or beads.
Decide which side you like best for the front, and decorate
it with buttons, beads, bows, or other accents. You can do the same with the sleeves. Whether or not you added a drawstring at the waist, this
style of dress looks lovely with a piece of ribbon cross-tied around the bodice.
First, place the ribbon across Hitty’s waist in the front.
Pass it on either side to the back.
Cross the ends on her back, and pass each end over the opposite shoulder.
Cross again in the front, passing the ends each under the opposite arm.
Tie in a pretty bow at the back of her waist.
This can create the appearance of a lovely gathered bodice.
This dress can be used for a school frock, nightgown, or
‘fancied up’ for a formal or day dress.
Just use your imagination!
© 2001 By Sara Cole Personal use only. Thanks!