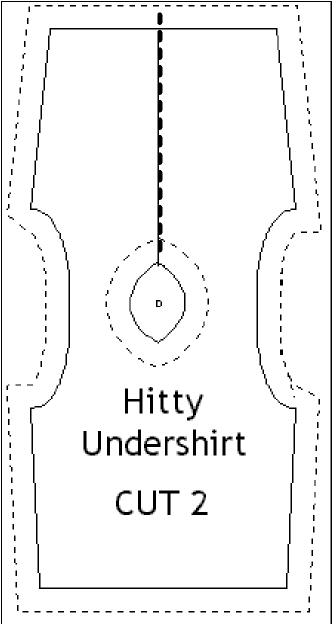
This undershirt pattern
is designed to be loose. You should adjust your stitches to fit your particular Hitty.
Handstitching will achieve the best results, but if you are a confident sewer, you
can machine sew. All seams are enclosed, and you can add lace or trim to the sleeves,
neck or hem as desired.
Step One:
Cut out two. On both of
the pieces, cut up the back on the dotted line provided. (This is the back.) Place
right sides together.
Step Two:
Starting at the back bottom
hem, sew up the back, around the neck, and back down the other side. Now, sew from
the bottom outside hem around the armholes only. Turn right side out, and
press.
Step Three:
This may be sort of confusing, and if
you have any questions, contact me and I'll try
to explain further.
The piece should still look like the pattern to the left.
Now, fold the garment to look like the top. (Bring the two hems together.) Now, sew
the side seam from front to back. (One continous seam.) Repeat for other side. This
should mean that your side seams are hidden inside the garment.
Step
Four:
Fold bottom hem under 1/4" all across, pin in place, and sew
shut.
I hope this is clear! As you do it, you shuold be able to see what I
mean.
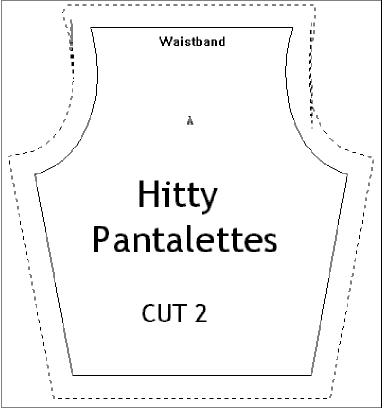
The box around the Pantalette pattern needs to measure 4 1/4" tall and 4" wide.
The box around the Undershirt pattern needs to measure 6 1/2" tall, and 3 3/4" wide.
You will need: 5" of round elastic for waist.
These panties can be shortened to fit your particular Hitty.
Trim or lace can be added to the bottom edge. I usually use Frenchh Seams, but have decided, for the sake of simplicity, to exclude them.
Step One:
Cut two. Sew, right sides together, at curved inseams.
Step Two:
Holding the piece in the waistband canter (not the seam) on both sides, pull apart so that the sewn seams align, and the piece looks like pants. Sew from bottom edge up the inseam, to the crotch, and down the inseam of the other leg. Turn bottom leg hems up 1/4", and then again 1/4" so that the hem does not have any raw edges. You may want to try the pants on your Hitty to adjust length. Finger press, pin, and sew.
Step Four:
Turn waistband hem down 1/4", and then again 1/4" so that the hem does not have any raw edges. Finger press, pin, and sew. Make sure this channel is deep enough for your elastic! Thread elastic (use a pin or darning needle) through the channel. Slip pants on Hitty, and adjust the length of the elastic for her special size. Fasten by either tying the elastic (if small enough) or sewing firmly.
Attach any trim or lace.